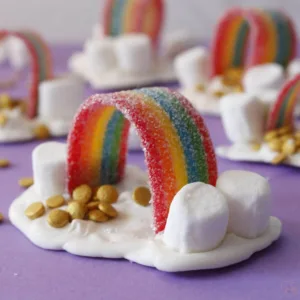
Rainbow Marshmallow Clouds

These rainbow marshmallow clouds are a colorful candy treat that kids love helping make. They use sour colorful rainbow belts, mini marshmallows, and white candy melts to create little clouds with rainbows standing in the center.

These candy clouds are fun for birthdays, classroom parties, and spring celebrations. You can even add gold sprinkles for a St. Patrick’s Day version. The best part is that they come together quickly with only a few ingredients.
This is one of those treats that kids immediately get excited about. The bright rainbows and marshmallow clouds make them look playful on a dessert table.
I like using them when we need something quick for a holiday party or school celebration.
Why You’ll Love This Recipe

Ingredients & Notes
- Rainbow Sour Belts – These create the rainbow that arches over the cloud.
- White Candy Melts – Melted candy melts form the cloud base that holds everything together.
- Mini Marshmallows – These help secure the rainbow and give the clouds their fluffy look.
- Gold Confetti Sprinkles – Optional but fun for decorating the cloud, especially for St. Patrick’s Day.
Be sure to check out the full recipe and ingredient list below
How To Make Rainbow Cloud Marshmallow Treats
Step 1: Line a cookie sheet with parchment paper.
Step 2: Melt ½ cup white candy melts in a microwave safe bowl in 15 second intervals. Stir between each interval until smooth.
Step 3: Pour the melted candy melts into a sandwich size zip top bag. Cut a small corner from the bag so the candy can be piped out.

Step 4: Pipe small cloud shapes onto the parchment lined cookie sheet. Fill in the center of each cloud with more melted candy.
Step 5: While the candy is still soft, cut a piece of rainbow sour belt and stand it upright in the cloud base.

Step 6: Place two mini marshmallows on each side of the rainbow to help hold it in place. Sprinkle gold confetti sprinkles on the cloud if using.
Step 8: Allow the candy clouds to cool completely, then gently remove them from the parchment paper.
Substitutions and Easy Swaps
- White chocolate chips can be used instead of candy melts. Melt them slowly and stir often so they stay smooth.
- Rainbow gummy strips can replace sour belts if that is what you have available.
- Small round sprinkles can be used instead of gold confetti sprinkles.
Storage
Store: Keep the candy clouds in an airtight container at room temperature. Freezing has not been tested for this recipe.

FAQs
How long do rainbow marshmallow clouds last?
When stored in an airtight container at room temperature, they usually last about 3 to 4 days.
Can I make rainbow marshmallow clouds ahead of time?
Yes. These treats can be made a day before a party and stored in a sealed container until ready to serve.
What if my candy melts harden while I’m working?
Return the candy melts to the microwave and heat in short 10 to 15 second intervals until smooth again.
More Fun Dessert Recipes You’ll Love
- Pistachio Bundt Cake
- Easy Pull Apart King Cake
- Caramel Apple Tacos
- Nutter Butter Puppy Chow
- Heath Bar Mini Bundt Cakes with Pecans

Rainbow Cloud Marshmallow Treats
Ingredients
- 1 package Rainbow Sour Belts
- 1/2 cup White Candy Melts
- 20-24 Mini Marshmallows
- Gold Confetti Sprinkles optional
Instructions
- Line a cookie sheet with parchment paper.
- Melt 1/2 c candy melts in the microwave in 15 second intervals, stirring between each, until the melts are completely melted.
- Pour the melted white chocolate into a sandwich size Ziplock bag. Cut a small piece of the so that you can squeeze the chocolate out.
- Draw small clouds on the cookie sheet covered parchment paper. Fill in the clouds once they have been outlined.
- Working quickly cut and stand a rainbow sour belt to fit the cloud you made while the chocolate is still wet.
- Set 2 mini marshmallows on each side of the rainbow to help hold the rainbow in place.
- Finish off with some gold coins on the white chocolate cloud.
- Let cool completely then carefully remove the cloud and store in an airtight container.
Notes
- If the chocolate dries before you get everything finished just add a little more warm chocolate on top. Then try again to add your candies.
- If your cloud breaks upon removal just add a little more chocolate to make the base thicker.
- If you know what size clouds you want to make cut the rainbows a head of time.
- If your chocolate gets too hard, empty the Ziplock bag back into the bowl and reheat in the microwave as directed above.
- Instead of using the Ziplock bag to make the clouds, you can use a spoon to create the shape and fill of the clouds.